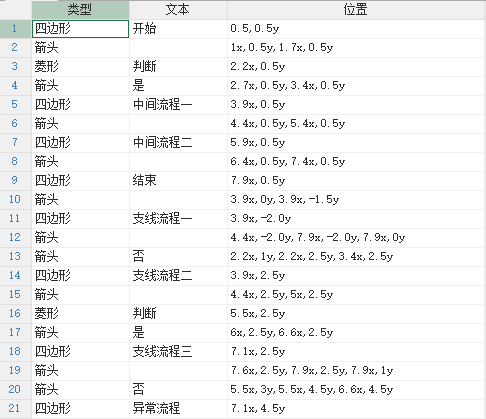
根据这个草图得到数据表:
使用GDI+绘制流程图
本节内容可以参考文件"\CaseStudy\流程图\纯代码流程图\纯代码绘制之四.Table"
我们可以直接用GDI+绘制流程图。
设计思路是用标记模拟形状,要点在于:
1、在GetDrawingBounds事件读取数据设置形状的位置和大小。
2、在OwerDrawMark事件读取数据绘制形状。
示例
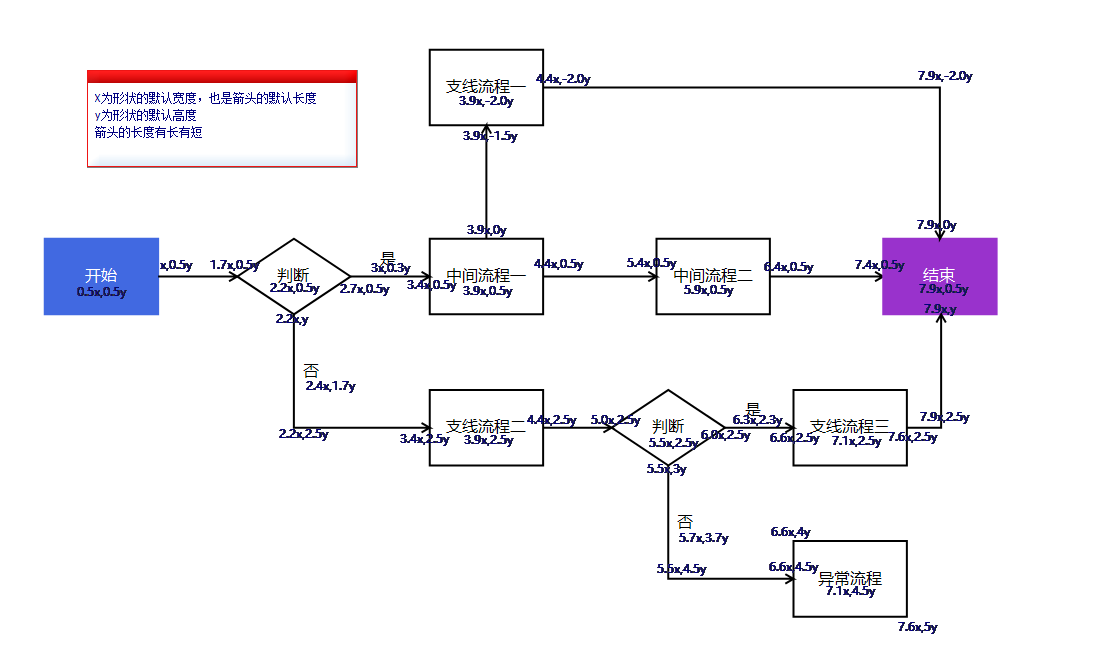
本节假定所有形状的大小一致,所以使用的草图和之前不一样,只标记了形状中心点的坐标:
根据这个草图得到数据表:
提示:
本节的示例只有形状及其文本采用GDI+绘制,箭头及其文本继续使用内置形状绘制:
代码分布在三个事件中。
1、窗口的AfterLoad事件代码用于定位形状:
'初始化地图控件,不是必须的,只是使得地图控件更适合作为流程图控件使用:
Dim
map
As
GeoMap = e.Form.Controls("Map1").GeoMap
map.UseGallPetersProjection =
True
'采用Gall
Peters投影方式
map.Viewport.Limits.MaxLat = 60
'排除高纬度地区,因为高纬度地区变形大
map.Viewport.Limits.MinLat = -60
map.Zoom = 12
'缩放指数设置为12,留足够的区间用于放大和缩小
map.CenterTo( - 160, 50)
'中心点设置在有效区域的左上,因为通常都是往右下绘制,同时也留有一定的余地往左上绘制
'增加矢量层:
Dim
layer
As
New
VectorLayer()
map.Layers.Add(layer)
layer.Style.Stroke.Width = 2
layer.Style.Font =
New
Font("微软雅黑",
12)
'用代码绘制流程图,注意以下定位均采用像素,在绘制时候要转为经纬度,
Dim
xStart
As
Integer
= 50
'本流程图整体是从左到右,所以起点在左中位置
Dim
yStart
As
Integer
= 200
Dim
xStep
As
Integer
= 96
'默认形状宽度,也是箭头的默认长度
Dim
yStep
As
Integer
= 64
'默认形状高度,宽高比大概是3:2,
96*2/3 = 64
For
Each
dr
As
DataRow
In
DataTables("流程图").DataRows
'绘制流程图
Dim
gps
As
New
List(Of
GeoPoint)
Dim
pts()
As
String
= dr("位置").Split(",")
For
idx
As
Integer
= 0
To
pts.Length - 1
Step
2
Dim
dx
As
Integer
= xStart + Val(pts(idx)) * xStep
Dim
dy
As
Integer
= yStart + Val(pts(idx + 1)) * yStep
Dim
p
As
New
Point(dx, dy)
gps.Add(map.ToGeoPoint(p))
Next
Select
Case
dr("类型")
Case
"四边形"
,
"菱形"
'菱形和四边形用GDI+绘制
Dim
mark
As
New
VectorPlacemark()
mark.Geometry = gps(0)
mark.Marker.Shape = MarkerShape.Custom
'指定采用标记使用自定形状
mark.Marker.CustomShape = map.CreateMarkShape(dr)
'将数据行设置为ShapeTag,方便OwerDrawMark事件调用
mark.Tag = dr
'将tag设置为对应的数据行,用于响应事件
layer.Items.Add(mark)
Case
"箭头"
'箭头及其文字继续用内置
形状绘制
Dim
item
As
VectorPolyline = map.CreateLineWithArrow(gps)
If
dr.IsNull("文本")
=
False
Then
Dim
dx1
As
Integer
= xStart + Val(pts(0)) * xStep
Dim
dy1
As
Integer
= yStart + Val(pts(1)) * yStep
Dim
dx2
As
Integer
= xStart + Val(pts(2)) * xStep
Dim
dy2
As
Integer
= yStart + Val(pts(3)) * yStep
Dim
dx
As
Integer
= dx1 + (dx2 - dx1) / 3
'其实文本位置不完全在线条中心,而是偏向起点
Dim
dy
As
Integer
= dy1 + (dy2 - dy1) / 3
If
dx1 = dx2
Then
dx = dx + 15
'如果是垂直线,则文本显示在线条右侧
Else
dy = dy - 15
'如果是水平线,则文本显示在线条上侧
End
If
Dim
txt
As
New
VectorPlacemark()
txt.Marker.Shape = MarkerShape.Custom
txt.Marker.CustomShape = map.CreateTextShape(dr("文本"))
Dim
p
As
New
Point(dx, dy)
txt.Geometry = map.ToGeoPoint(p)
txt.Tag = dr
'将tag设置为对应的数据行,用于响应事件
layer.Items.Add(txt)
End
If
item.Tag = dr
'将tag设置为对应的数据行,用于响应事件
layer.Items.Add(item)
End
Select
Next
2、Map控件的GetDrawingBounds事件
的代码用于计算形状的位置和大小:
If
e.ShapeTag
IsNot
Nothing
AndAlso
TypeOf
e.ShapeTag
Is
DataRow
Then
Dim
dr
As
DataRow = e.ShapeTag
Select
Case
dr("类型")
Case
"四边形",
"菱形"
Dim
cx
As
Single
= e.Bounds.X + e.Bounds.Width / 2
'先计算中心点位置
Dim
cy
As
Single
= e.Bounds.Y + e.Bounds.Height / 2
Dim
width
As
Single
= 96
'默认宽高
Dim
height
As
Single
= 64
e.Bounds =
New
RectangleF(cx - width / 2, cy - height / 2, width, height)
'计算形状的绘制位置和区域
End
Select
End
If
3、Map控件的OwerDrawMark事件的代码如下,这段代码用GDI+绘制形状和文本:
If
e.ShapeTag
IsNot
Nothing
AndAlso
TypeOf
e.ShapeTag
Is
DataRow
Then
Dim
dr
As
DataRow = e.ShapeTag
Dim
brush
As
Brush = Brushes.Black
'字体颜色,默认为黑色
Dim
pen
As
New
Pen(color.Black)
'用于绘制边框的画笔,默认为黑色,宽度为2
pen.Width = 2
Dim
rect
As
Rectangle = Rectangle.Round(e.Bounds)
'先将RectangleF转换为Rectangle
Select
Case
dr("类型")
Case
"四边形"
If
dr("文本")
=
"开始"
Then
e.Graphics.FillRectangle(Brushes.RoyalBlue, rect)
brush = Brushes.White
ElseIf
dr("文本")
=
"结束"
Then
e.Graphics.FillRectangle(Brushes.DarkOrchid, rect)
brush = Brushes.White
Else
e.Graphics.DrawRectangle(pen, rect.X, rect.Y, rect.Width,
rect.Height)
End
If
Case
"菱形"
Dim
p1
As
New
PointF(rect.X, rect.Y + rect.Height / 2)
'左顶点
Dim
p2
As
New
PointF(rect.X + rect.Width / 2, rect.Y)
'上顶点
Dim
p3
As
New
PointF(rect.X + rect.Width , rect.Y + rect.Height / 2)
'右顶点
Dim
p4
As
New
PointF(rect.X + rect.Width / 2, rect.Y + rect.Height)
'下顶点
e.Graphics.DrawPolygon(pen, {p1, p2, p3, p4})
'绘制菱形
End
Select
Dim
fnt
As
New
Font("微软雅黑",
12)
'绘制形状的文本
Dim
fmt
As
New
StringFormat()
fmt.Alignment = StringAlignment.Center
fmt.LineAlignment = StringAlignment.Center
e.Graphics.DrawString(dr("文本"),
fnt, brush, rect, fmt)
End
If
这里的文本和形状真正合二为一了。